Every seasoned trader, such as @Zeiierman and I, had to have started somewhere. Logically, it wouldn’t make sense to start by throwing your life savings into a volatile market from Day 0 itself. Most, if not all, traders start by budgeting and investing small portions of their income, which is a GREAT strategy for long-term investing.
But it won’t really help you with big plays, will it? And you still can’t put your entire bag of eggs in one basket, either, especially with virtually no market experience. That is where paper trading comes in.
If you’re looking to sharpen your skills without the heartbreak of losing real capital, paper trading on TradingView is your best friend. In this guide, we’re going to walk through exactly how to set up and use paper trading on TradingView. Whether you’re testing a new strategy or just learning the ropes, this practical walkthrough will get you up and running in minutes.
1. What Is Paper Trading and Why It Actually Matters
Paper trading is a simulation of executing trades in real market conditions using virtual capital. Prices move in real time, candles form the same way they do in live markets. The only difference is that profits and losses are simulated.
Many traders assume paper trading is only about learning buttons and basic order placement in TradingView. In reality, its real value lies elsewhere. If done correctly and religiously, paper trading is a quick shortcut to gaining market experience without losing real capital.
Paper trading allows you to:
- Test a trading strategy without financial pressure.
- Practice execution timing and order placement
- Understand drawdowns before they cost real money.
- Identify emotional habits in a risk-free environment.
- Build data-backed confidence in your edge.
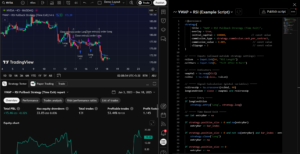
2. Set Up Paper Trading on TradingView
Step 1: Connecting Your Paper Trading Account
To begin paper trading, you need a TradingView account. A free account is enough to get started, although paid plans unlock more features and indicators.
Once you have logged into your account, follow these steps:
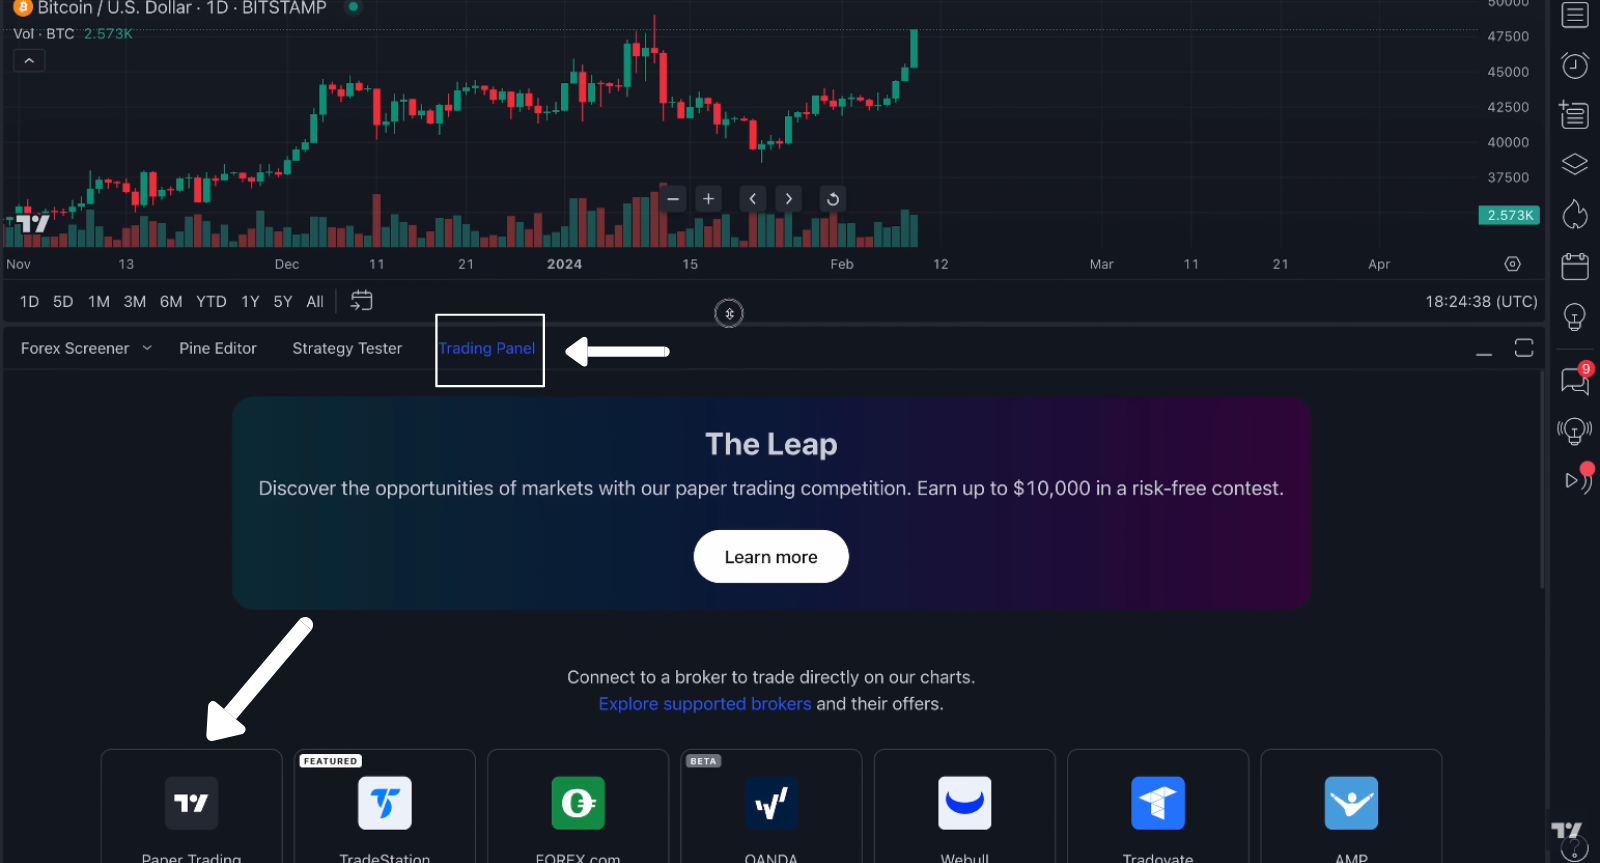
- Open any chart: Head over to the TradingView Supercharts.
- Locate the Trading Panel: At the very bottom of your screen, you’ll see a row of tabs. Click on the one labeled Trading Panel.
- Select Paper Trading: You’ll see a list of brokers. Look for the one titled Paper Trading by TradingView.
- Click Connect: A pop-up will appear. Hit connect again, and you’re officially in the simulation.

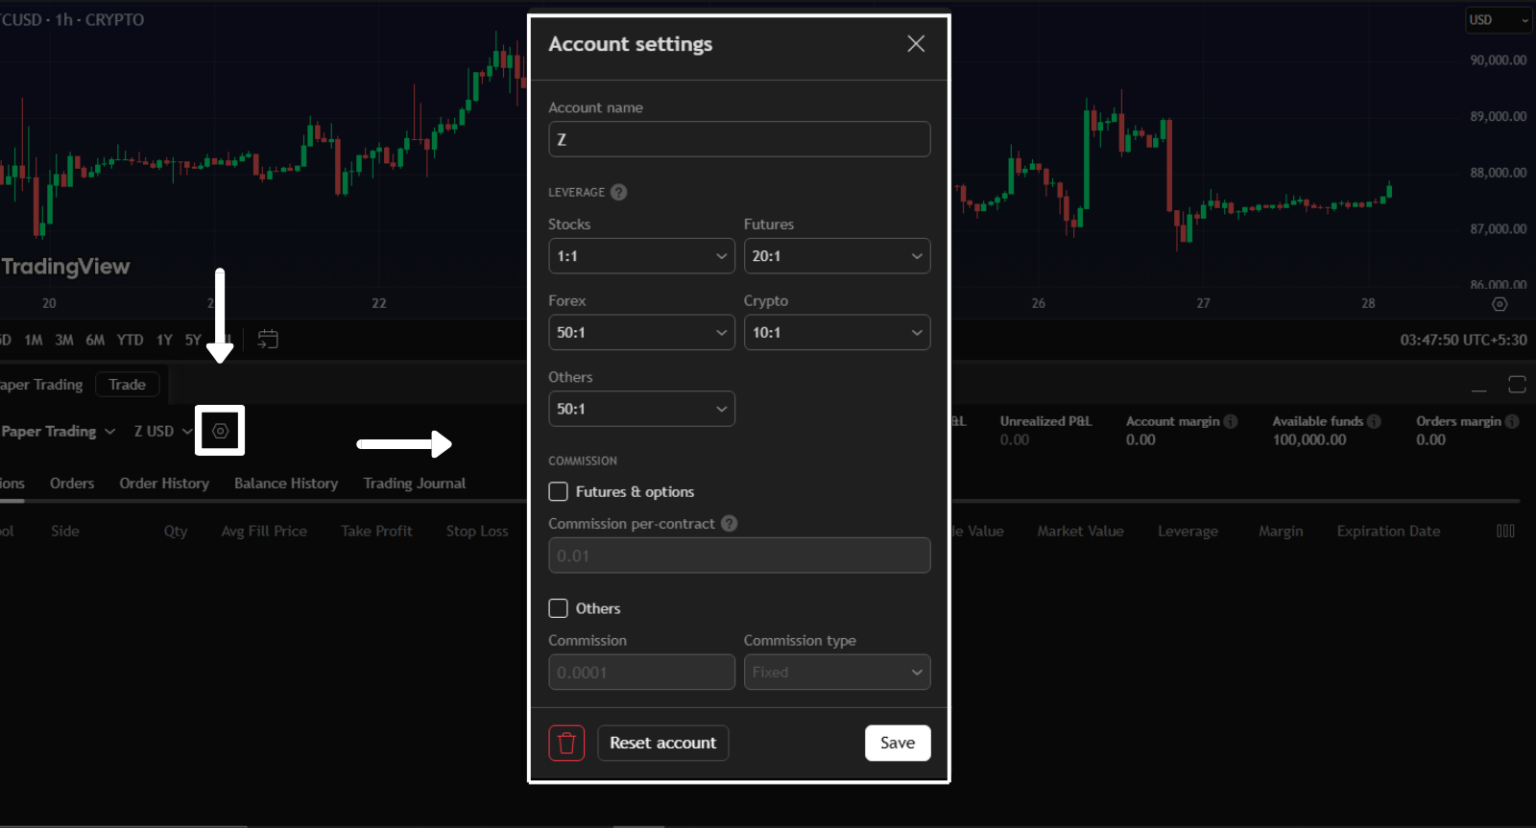
Step 2: Configure balance, currency, commission, leverage
By default, TradingView gives you $100,000. While it’s fun to see six figures, it’s not very helpful if you only plan to start with $2,000. You want your practice to be as realistic as possible.
You also have to set realistic parameters, such as leverage, commissions, and the currency you will trade in. You can also reset your trading balance if and when needed.
In the Trading Panel, click the Account name or the gear icon. Enter the amount of money you actually plan to trade with in real life, and the commission and leverage settings similar to the real brokerage account you will use in trading. Click reset and voila.
Read: How to use TradingView’s Strategy Tester?First and foremost, build a chart layout that is comfortable to you. It will include your core indicators, structure tools, and visual (UI/UX) preferences. If you rely on moving averages, keep only the ones you actually use. If you trade based on price structure, make sure your support and resistance levels are clearly marked. If session timing matters to your strategy, your chart should reflect session boundaries.
📌 Pro Tip: Treat this virtual money like it’s your rent money. If you don’t take the “fake” losses seriously, you won’t learn the discipline needed for the “real” ones.
Step 3: Build your live-ready chart layout
Click ‘New Order’ (or ‘Trade’) to open the order ticket on the right. To place a buy/sell order, you need to know about three fundamentals:
- Market: Buy or sell right now at the current price.
- Limit: Buy only if the price drops to a specific level.
- Stop: Enter or exit once the price hits a “trigger” level.
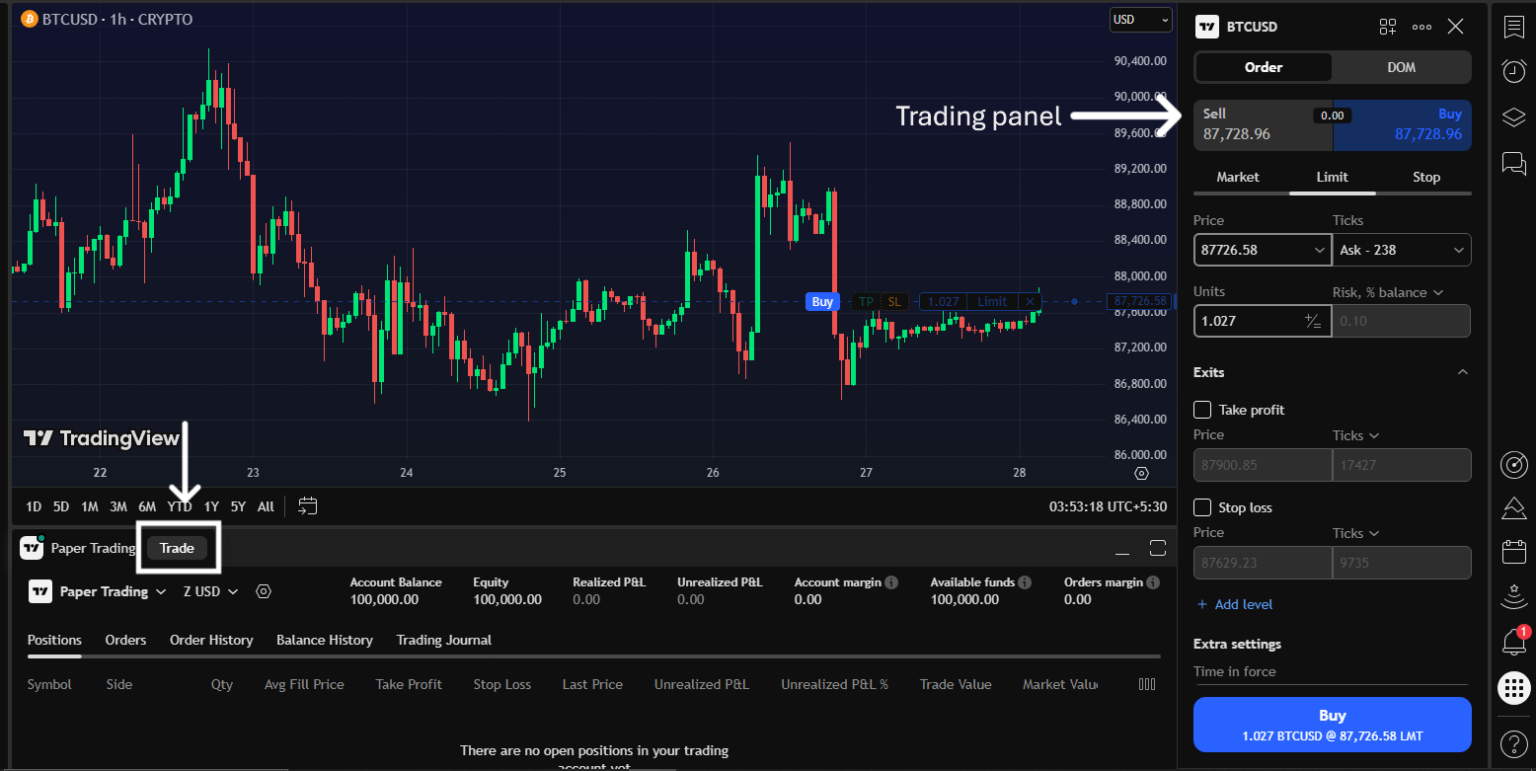
The Paper trading panel at the bottom gives you an overview of your trading activities. It will show your open positions, account balance, active pending orders, and realized/unrealized P&L.
3. Placing and Managing Trades
I used to believe finding a good entry is the hardest part of trading. Don’t get me wrong, it is tough. But perhaps not as much as planning and timing your exits while managing risk in live markets. This is what separates disciplined traders from impatient, inconsistent ones – regardless of market experience.
Paper trading is where trade management habits are formed. Always remember that sloppy habits can (and do) turn out to be expensive later on. You must manage your trade as if it were your real money at stake.
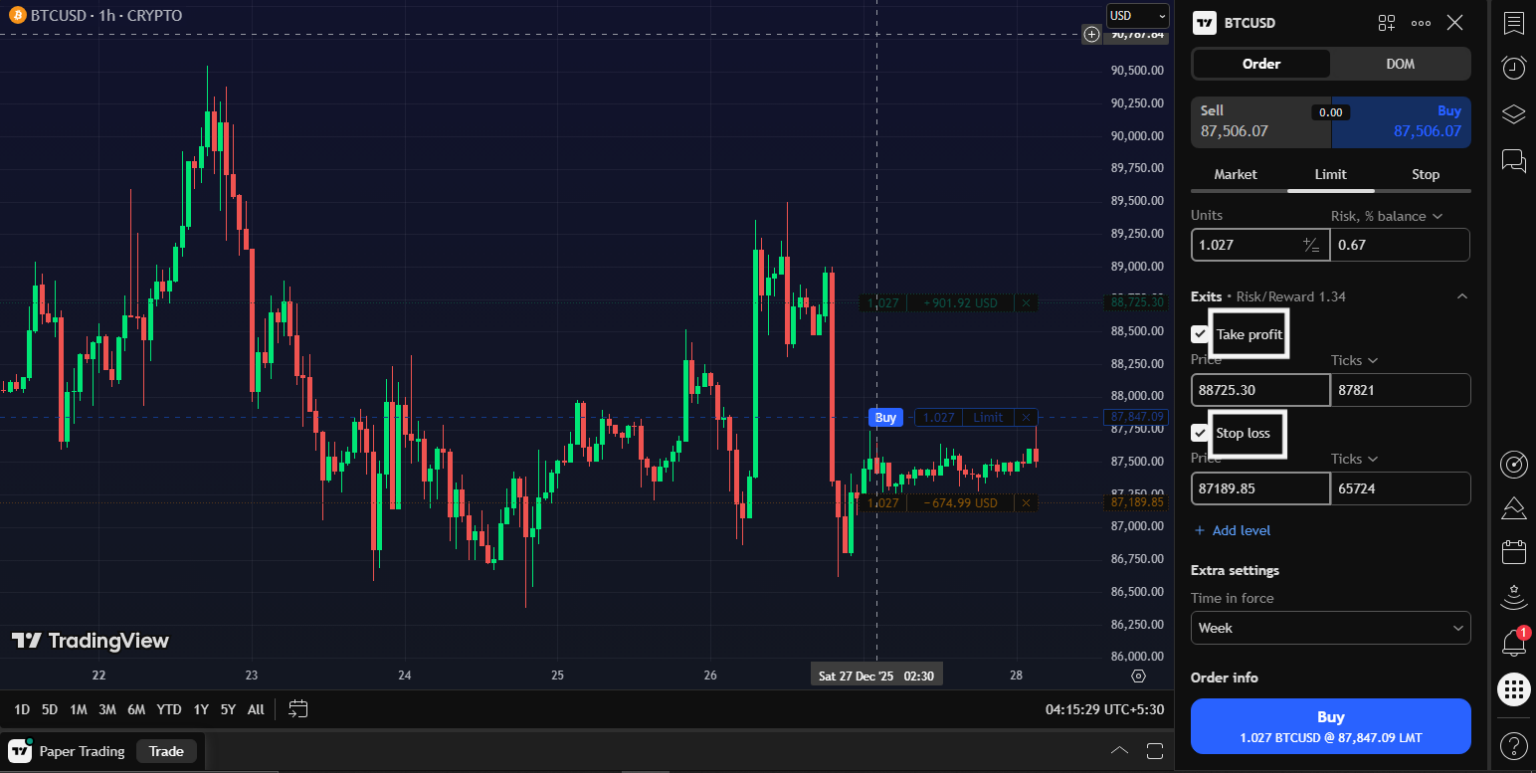
A trade without a plan is just a gamble. TradingView makes it incredibly easy to set your Stop Loss (SL) and Take Profit (TP) before you even hit the buy button. In the Order Ticket, check the boxes for “Take Profit” and “Stop Loss.” You can set these by:
- Price: The exact amount of the asset.
- Pips/Ticks: The distance from your entry.
- Percentage: How much of a move you’re looking for.
The system also allows drag-and-drop management once your trade is live. Look carefully, and you’ll see lines on your chart representing your entry, SL, and TP. Want to move your Stop Loss to break even? Just click the line and drag it. It’s that simple.
I also have a detailed guide to TradingView’s Take-Profit and Stop-Loss settings if you need a better understanding of the concept.
4. Review & Journal Your Results (the real edge)
One of the most potent uses of TradingView paper trading is structured strategy testing. The paper trading panel provides trade history, balance history, and a trading journal. Please think of this as your after-game tape, where you can review it to see where you excelled and where you messed up.
After each session, review:
- Entry logic: Review whether your entry followed your rules or was taken out of impatience or impulse. A good trade starts with an apparent, repeatable reason, not just a good-looking chart.
- Exit logic: Check if you exited because your plan told you to, or because fear or greed took over. Consistent exits matter more than perfect exits.
- Risk-to-reward: Confirm that the trade offered enough potential reward for the risk you took. Even good setups fail if the reward does not justify the risk.
- Market conditions: Note whether the market was trending, ranging, volatile, or slow during the trade. A strategy works best only in certain situations, and reviews help you spot that fit.
- Emotional reactions: Observe how you felt during the trade and how those emotions affected decisions. Emotional awareness is what turns experience into discipline.
📌 Pro Tip: Test your logic and strategy while keeping note of every variable factor involved. Look at what worked and didn’t. Reset after every test and work on the base framework (logic) while changing a few variables.
5. Common Mistakes to Avoid when Paper Trading
The biggest trap is also the most obvious: it’s not real money. Without the gut-wrenching feeling of losing a $500 paycheck, our brains don’t learn the same lessons. Without self-checks and consequences, you can quickly end up in a loop of revenge trading where you double down on positions to try to break even. Why? Because there’s no real-life consequence.
In the world of paper trading, orders often execute instantly at the exact price you want. In the real world, there’s slippage and commissions. Slippage occurs when you wish to purchase something at $10.00, but the price rises to $10.05 by the time your order reaches the market.
Read: How to Mark Take Profit and Stop Loss on TradingView (Step-by-Step Guide)If your strategy relies on tiny 1% gains, those seemingly invisible costs will turn a winning paper strategy into a losing real-world one. Always aim for slightly wider profit targets than your paper results suggest you need.
📌 Pro Tip: TradingView allows you to set commission and slippage. Set it according to your broker charges to simulate a real trade environment.
Finally, the third biggest mistake is hopping between strategies without understanding or executing any of them correctly. Since there’s no risk, beginners tend to switch strategies after every loss. They try a breakout strategy on Monday, get stopped out, and switch to a mean-reversion strategy on Tuesday. It prevents you from ever seeing the “long-term edge” of a system.
Commit to one strategy for at least 50 to 100 paper trades to get a meaningful sample. You need a large enough sample size to know if the strategy actually works or if you just got lucky.
6. Next Steps: From Paper to Live
Now that you have gained experience through paper trading, it’s time to put your real capital on the line and test whether your strategies will survive the markets with all their quirks.
In my experience, the best way to make this transition is to set ‘promotion criteria.’ The idea is not to risk one grand on the very first trade. I also have a ‘minimum trade’ qualification for my folks at the Zeiierman Trading community. You can consider yourself a graduate after logging 75-100 trades, provided you have the following statistics for more than 4 back-to-back weeks:
- Positive expectancy (e.g., Avg R ≥ +0.2 per trade or better).
- Reasonable win rate + payoff (e.g., ≥40–45% win rate with ≥1.5R average winner).
- Max drawdown within your tolerance (define a number, e.g., ≤8–10R total; ≤3R per week).
Once you graduate, you need to start small. I rarely recommend risking more than $5–$20 per trade (or 0.25–0.5% of your account). Keep the same layout, rules, and checklists you used on paper. Change nothing except position size. However, this time, you need to expect and account for real-world trading issues such as slippage, latency, partial fills, spreads, and gaps.
Here are some guardrails you can (and should) follow for the first week:
- No more than 3 traders each day
- Stop if max loss (daily) goes over -2R
- Stick to your plan, no ‘impromptu’ trades or ‘revenge’ trades.
- Only trade your A+ paper setups; forget others for now.
After 30–50 live trades, if the expectancy and drawdown match your paper stats, double the risk once (e.g., from $10 to $20 per trade). If you hit your max drawdown or break rules, cut size in half and run another 20 paper trades to recalibrate.
📌 Pro Tip: Set alerts for your levels and let the market come to you. Most “paper-to-live” blowups come from forcing fills, not from the setup itself.
SM_Trader
SM_Trader is a highly experienced coder and strategy developer who brings the most complex algorithms to life. As a member of MENSA, the prestigious organization for individuals with intelligence scores in the top 2% of the world, he combines exceptional analytical skills with a keen eye for numbers and statistics, empowering businesses to grow at the right pace and in the right direction.
More from SM_Trader